 One of the most popular posts here is How to Disable and Remove Important Labels in Gmail. Seems lots of people are being driven crazy by Google’s overzealous and unwanted “helpfulness.” Case in point, I recently had a reader leave this question on that post:
Do you have a similar workaround for Updates in Gmail? I have unchecked the category in settings, but items are still going there. Also, we have thousands of emails in Updates folder but I don’t want to delete them because then it deletes them everywhere.
Here’s what Google Support has to say, but it’s totally unhelpful.
Yes, there is a way to stop Gmail from marking emails as Updates and prevent them from being automatically moved to the Updates category. You can create a similar filter to the one you use for the Important markers. Here’s a step-by-step guide:
How to Set Up a Filter to Stop Emails from Being Marked as Updates

- Open Gmail and Go to Settings:
- Click on the gear icon in the top right corner.
- Select “See all settings.”
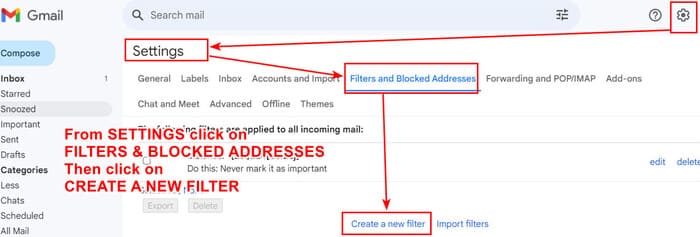
- Navigate to Filters and Blocked Addresses:
- Click on the “Filters and Blocked Addresses” tab.
- Scroll down and click on “Create a new filter.”
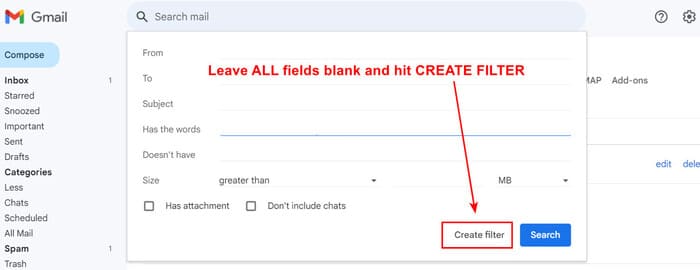
- Set Up the Filter Criteria:
- Leave ALL fields empty EXCEPT To field and put in your email. If you leave everything blank then you can’t continue with the filter and Create Filter is grayed out.
- Click on CREATE FILTER.
- Apply the Filter Settings:
- Click on “Create filter.”
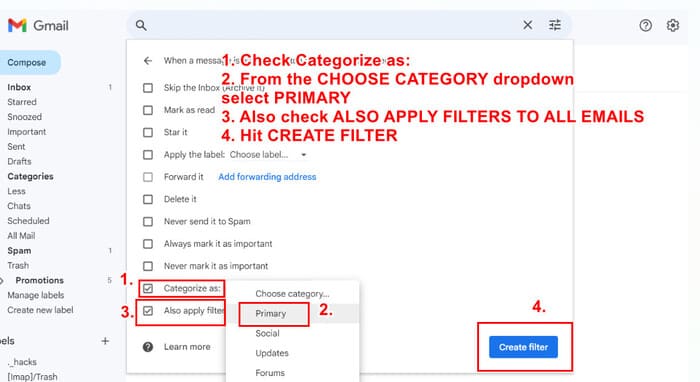
- In the next screen, check the box for “Categorize as” and select “Primary” from the dropdown menu.
- Optionally, check “Apply the label” and select a label you want to apply to these emails for easier organization.
- Check the box “Also apply filter to matching conversations” to apply the filter to existing emails.
- Finalize the Filter:
- Click “Create filter” to save it.
This filter will effectively prevent new emails from being categorized as Updates by ensuring they are always placed in the Primary tab.
Handling Existing Emails in the Updates Folder
For existing emails in the Updates folder that you don’t want to delete, you can move them to another folder without deleting them:
- Select All Emails in the Updates Folder:
- Go to the Updates tab in Gmail.
- Check the box at the top to select all emails on the current page.
- Click on “Select all conversations in Updates” to select all emails in the Updates folder.
- Move Emails to Another Folder:
- Click on the “Move to” icon (a folder with an arrow) and select “Inbox” or any other folder/label you want to move them to.
This will ensure your emails are moved out of the Updates category without being deleted.
By following these steps, you can stop Gmail from automatically categorizing emails as Updates and manage your existing emails more effectively.
This all seems very complicated!
If you just want to show all emails in the main mailbox, just follow the instructions Google support provided query linked in the in the article:
Settings > See all settings > Inbox
Inbox type: Default
Untick the categories you don’t want to be separated out and click save.
This may not remove the categories all together, but it will show you all of your emails which I think is what most people are looking for.
Yes, that method is a much quicker way to get a unified inbox view, and it’s a great solution for many people.
The key difference is that the Settings toggle hides the Updates tab, while the filter I described stops Gmail from categorizing emails as ‘Updates’ in the first place.
The filter is a more powerful, behind-the-scenes fix that ensures these emails are always treated as Primary, no matter what device you’re using or what your inbox settings are. It’s for someone who wants to completely disable the ‘Updates’ categorization behavior, not just hide it from view.
So it really depends on the user’s goal: for a quick UI clean-up, your method is perfect. For completely stopping Gmail’s sorting algorithm for this category, the filter is the way to go. Thanks for adding to the conversation!
Well, this mostly works. Except for the fact that all the emails that used to be in the Promotions section have now been moved to the Primary section. Fix that and you’ll really have a solution. I don’t need to wade through hundreds of Promotions emails to find the important emails. I think the problem is when you set up the filter so everything goes to Primary. But changing that filter will push all of the important emails to end up in Promotions. That isn’t right either.
The real solution would have been for Google to not have shoved the Updates category down our throats, with no option to not use it. I’m sure many of us have contacted them about it, but they are not listening.
By the way, 3 times today I had emails land in the Updates category, even though I applied your settings, while at the same time zero emails went into Promotions, except for the ones I manually put there.
Hi Carol, I can feel your frustration all the way over here. I get it. It’s maddening. This is all I have for a solution. It seems to work for a lot of people. I’m sorry it’s not solving your problem. If you find a solution for your setup, it would be great if you’d share it here to help others in the same boat.
What more proof does anyone need that software companies are THE MOST ARROGANT entities on the planet.
There is a missing step for this: How to Set Up a Filter to Stop Emails from Being Marked as Updates
Set Up the Filter Criteria:
Leave ALL fields empty EXCEPT To field and put in your email. If you leave everything blank then you can’t continue with the filter and Create Filter is grayed out.
Click on CREATE FILTER.
This was very helpful btw. Thank you.
Thanks Ashley. I’ve added this step to the post.
Thank you for the article!
Although I read your October 18 response multiple times, perhaps I missed something or don’t completely understand it: Did you ever address the issue in the first paragraph of Louise B Andrew’s October 17, 2024 comment? The “Create filter” button also remains disabled for me—and I can’t complete the entire procedure under “How to Set Up a Filter to Stop Emails from Being Marked as Updates”—if I don’t enter any search criteria. In other words, I can’t leave all fields empty *and* click the *disabled* “Create filter” buttom.
Thanks again!
Louise B Andrew
October 17, 2024 at 6:09 pm
This doesn’t seem to work. When you ask it to create a filter, it won’t let you do so without filling in some search criteria.
Yes, here is that response. It should take care of the problem.
You need to find that label and update the criteria to only contain the identifying criteria that label needs to mark the correct emails. Or you can remove the label so that it stops showing on all emails and then recreate it setting the correct criteria.
To stop Gmail from marking your emails as updates and to remove a label from all emails, follow these steps:
Stop Gmail from Marking Emails as Updates
Open Gmail and click on the gear icon in the upper right corner.
Click on “See all settings”.
Click on the “Filters and Blocked Addresses” tab.
Click on “Create a new filter”.
In the “Has the words” field, type “category:updates” (without the quotes).
Click on “Create filter”.
In the next screen, check the box next to “Skip the Inbox (Archive it)”.
Click on “Create filter”.
This process should prevent Gmail from marking your emails as updates.
Remove a Label from All Emails
In the search box at the top of Gmail, type “label:[your-label]” (replace [your-label] with the name of the label you want to remove).
Click on the “Select all” checkbox at the top of the list of emails.
Click on the “Label” button at the top (it looks like a tag).
Uncheck the box next to the label you want to remove.
Click on “Apply”.
This process should remove the label from all your emails. If you have a large number of emails with this label, it might take some time for the change to take effect.
Please note that Gmail requires some search criteria to create a filter. In this case, “category:updates” is the search criteria that tells Gmail to apply the filter to emails marked as updates.
Good luck!
My email should be private. Why is Google reading my email to determine which ones I should be looking at first? What a pathetic and obvious excuse to stick their nose into my business yet again! This is not a “service.” The default situation should be, Google suggests they could look at my emails and file some of them in “Updates” and I decide up front if I want to let them do it. And I then I tell them, “No, I bloody well don’t want you to do it!”
Don’t even get me started! :) Sadly, we all now need to assume that nothing is private. You don’t own any software–instead, you get the “privilege” of paying in perpetuity to use any “service.” And, basically, you have no rights.
What more proof of the utter arrogance of large software companies does anyone need? Just @#$% implement a setting to TURN IT OFF. HOW HARD IS THAT. Utter arrogance.
Couldn’t agree more. It’s beyond maddening.
They do it b/c it uses up storage and you using up storage means eventually needing to pay Google for storage space.
Thanks, sounds like this might work. Eventually I narrowed down the 35 or so emails that SHOULD have had this label and moved them to a new file, then removed the label from all 35K that had been inappropriately labeled with it. I did this by searching for the label, selecting all, UNchecking the relevant ones (one page worth) and clicking on the “unlabel” icon at the top left. It only took a few minutes after I had figured it out.
Still have no idea how it could have happened that ALL of my emails for many months got labeled with this one category; wouldn’t that have required that I at some time actually created a filter and requested that? Or is Gmail trying to be “helpful”… ;>
At any rate, thanks so much for contributing your expertise and logical approach to the world of folks who are not so technologically facile. Bookmarking your site!
Glad it looks like you got the issue cleared up. And, yes, Google has a way of being so aggressively helpful that they cause problems instead. :)
This doesn’t seem to work. When you ask it to create a filter, it won’t let you do so without filling in some search criteria.
I seem to have everything listed in updates, but this is not my problem (I don’t know how to find updates and never need them). My problem is that the label from another minor file I once created but need to maintain is being applied to all emails, which is even more annoying! Can you help?
Thanks,
You need to find that label and update the criteria to only contain the identifying criteria that label needs to mark the correct emails. Or you can remove the label so that it stops showing on all emails and then recreate it setting the correct criteria.
To stop Gmail from marking your emails as updates and to remove a label from all emails, follow these steps:
Stop Gmail from Marking Emails as Updates
Open Gmail and click on the gear icon in the upper right corner.
Click on “See all settings”.
Click on the “Filters and Blocked Addresses” tab.
Click on “Create a new filter”.
In the “Has the words” field, type “category:updates” (without the quotes).
Click on “Create filter”.
In the next screen, check the box next to “Skip the Inbox (Archive it)”.
Click on “Create filter”.
This process should prevent Gmail from marking your emails as updates.
Remove a Label from All Emails
In the search box at the top of Gmail, type “label:[your-label]” (replace [your-label] with the name of the label you want to remove).
Click on the “Select all” checkbox at the top of the list of emails.
Click on the “Label” button at the top (it looks like a tag).
Uncheck the box next to the label you want to remove.
Click on “Apply”.
This process should remove the label from all your emails. If you have a large number of emails with this label, it might take some time for the change to take effect.
Please note that Gmail requires some search criteria to create a filter. In this case, “category:updates” is the search criteria that tells Gmail to apply the filter to emails marked as updates.
Good luck!